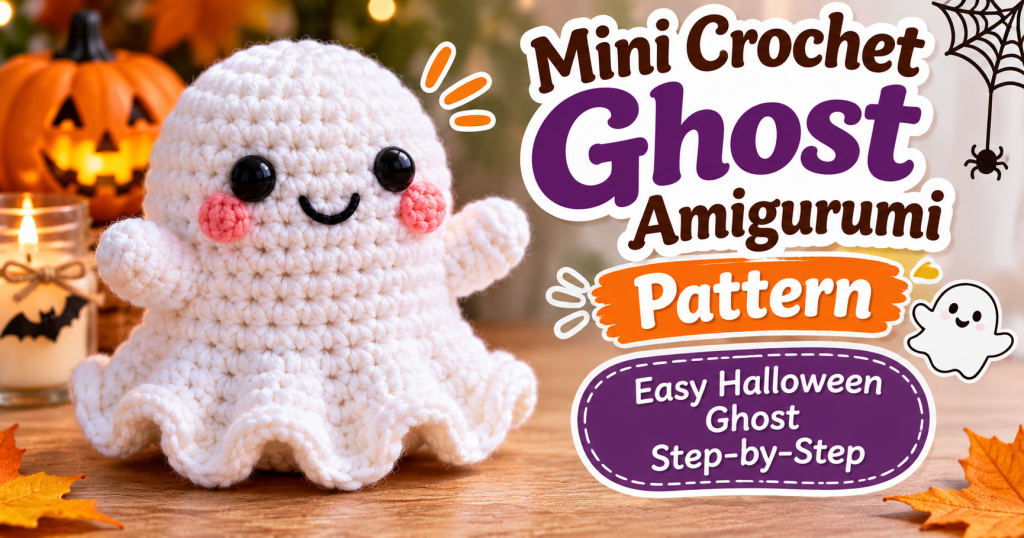
Looking for a cute and spooky crochet project for Halloween? This Mini Crochet Ghost Amigurumi is an adorable little decoration that is fun to make and perfect for beginners who enjoy creating tiny handmade toys.
With its round head, tiny arms, sweet embroidered face, and flowing wavy bottom, this little ghost is full of personality. It makes a lovely Halloween decoration, a handmade gift, a cute keychain, or even a small addition to your seasonal crochet collection.
The best part? This mini ghost doesn’t require many materials or complicated techniques. You’ll mainly use single crochet, increases, decreases, and a few basic stitches to create its adorable shape.
You can make it in classic white yarn, experiment with pastel colors, or add a little hanging loop to turn it into a Halloween ornament.
Let’s grab our crochet hooks and get started!
Related : Crochet Star Amigurumi Pattern , Cute Star Plushie Tutorial
Mini Crochet Ghost Pattern at a Glance
- Project: Mini Crochet Ghost Amigurumi
- Skill Level: Beginner
- Crochet Terms: US Terms
- Finished Size: Approximately 3–3.5 inches (7.5–9 cm)
- Yarn: DK cotton or acrylic yarn
- Hook Size: 2.5 mm crochet hook
- Construction: One-piece head and body with a separately crocheted wavy skirt
- Techniques: Magic ring, single crochet, increases, decreases, and slip stitches
- Estimated Time: 1–2 hours
Materials You’ll Need
Before starting, prepare these supplies:
- White DK-weight cotton or acrylic yarn.
- Small amounts of black yarn for the eyes and mouth.
- A little pink yarn for the cheeks.
- 2.5 mm crochet hook.
- Polyester fiberfill stuffing.
- Tapestry needle.
- Stitch marker.
- Scissors.
Choosing the Right Yarn
Cotton yarn is a great choice for this mini ghost because it creates neat stitches and helps the finished shape hold together.
Acrylic yarn also works beautifully if you prefer a softer, slightly fluffier appearance.
White is the traditional choice, but pastel purple, light blue, cream, and pale pink can give your ghost a different personality.
Crochet Abbreviations (US Terms)
This pattern uses US crochet terminology.
- MR – Magic Ring
- CH – Chain
- SC – Single Crochet
- HDC – Half Double Crochet
- DC – Double Crochet
- SL ST – Slip Stitch
- INC – Increase (2 SC in the same stitch)
- DEC – Decrease (Single Crochet 2 Together)
- BLO – Back Loop Only
- ST – Stitch
- R – Round
Work in continuous spiral rounds unless otherwise specified. Use a stitch marker to keep track of the beginning of each round.
Part 1: Crochet the Ghost’s Head
Start with white yarn and your 2.5 mm crochet hook.
Round 1: Make a magic ring and crochet 6 SC into the ring. (6)
Round 2: INC in each stitch around. (12)
Round 3: Repeat (1 SC, INC) around. (18)
Round 4: Repeat (2 SC, INC) around. (24)
Round 5–8: SC in each stitch around. (24)
At this stage, your crochet piece should look like a small rounded head.
Keep your stitches tight and even to prevent the stuffing from showing.
Part 2: Add the Little Ghost Arms
Now we’ll create two tiny arms that extend from the sides of the ghost.
Continue working with white yarn.
On the next round, crochet the following:
Round 9:
- SC 6.
- CH 5.
- SL ST into the second chain from the hook and into the next 3 chains.
- Skip 1 stitch on the body and continue with SC 11.
- CH 5.
- SL ST into the second chain from the hook and into the next 3 chains.
- Skip 1 stitch on the body and crochet SC 5.
The two little arms should extend outward from the sides.
Make sure your slip stitches are firm but not so tight that the arms curl excessively.
Part 3: Crochet the Body
Continue working around the ghost’s body.
Round 10: Repeat (3 SC, INC) around. (30)
Round 11: SC in each stitch around. (30)
Round 12: Repeat (3 SC, DEC) around. (24)
Round 13: Repeat (2 SC, DEC) around. (18)
Before closing the body, add polyester stuffing through the opening.
Use small amounts at a time and shape the head gently with your fingers.
Round 14: Repeat (1 SC, DEC) around. (12)
Round 15: DEC around. (6)
Fasten off, leaving a short yarn tail. Thread the tail through the remaining front loops and pull gently to close the opening.
Your ghost should now have a rounded head and a small stuffed body.
Part 4: Crochet the Flowing Ghost Sheet
This is the part that gives your ghost its classic Halloween appearance!
We’ll create a little skirt that hangs down around the body.
Turn your ghost upside down and locate the unused front loops from the round where you worked BLO. These loops will be used to attach the sheet.
Join white yarn to one of the unused loops.
Round 1: Repeat (2 SC, INC) around. (24)
Round 2: SC in each stitch around. (24)
Round 3: SC in each stitch around. (24)
Round 4: Repeat (3 SC, INC) around. (30)
Now it’s time to create the wavy bottom.
Round 5: Repeat the following sequence around:
- 1 SC in the next stitch.
- 1 HDC in the next stitch.
- 1 DC in the next stitch.
- 2 DC in the next stitch.
- 1 DC in the next stitch.
- 1 SL ST in the next stitch.
Repeat this sequence around to create a decorative wavy edge.
The combination of different stitch heights creates the appearance of a floating ghost sheet.
Fasten off and weave in the yarn end neatly.
Helpful Tip: If the bottom looks too flat, gently adjust the fabric with your fingers to emphasize the waves.
Part 5: Embroider the Ghost’s Face
Now your little ghost needs a personality!
Take black yarn and a tapestry needle.
Eyes
Create two small black embroidered eyes on the front of the head.
Position them evenly, leaving enough space between them for the mouth.
You can use tiny horizontal stitches or small French knots to create the eyes.
Mouth
Use black yarn to embroider a small smile below the eyes.
A simple curved line works beautifully.
Pink Cheeks
With pink yarn, add two small blush marks underneath the eyes.
These little details make the ghost look extra adorable!
Before finishing, check that the facial features are centered and symmetrical.
Part 6: Finishing Touches
Your mini crochet ghost is almost ready!
Take a moment to:
- Adjust the stuffing so the head looks nicely rounded.
- Shape the arms so they extend outward.
- Arrange the wavy sheet evenly around the bottom.
- Hide all loose yarn ends.
- Check that the embroidered facial details are secure.
If you want to turn your ghost into a hanging Halloween ornament, attach a small chain loop to the top of its head.
You can also add a small keychain ring to create a cute handmade accessory.
Cute Ways to Customize Your Mini Crochet Ghost
One of the nicest things about making amigurumi is being able to customize every little detail.
Here are some fun ideas:
1. Pastel Ghost
Instead of white, try lavender, baby pink, mint green, or light blue yarn.
2. Halloween Keychain
Attach a metal keychain ring to the top and use your ghost as a seasonal bag accessory.
3. Blushing Ghost
Add larger pink cheeks and a tiny embroidered smile for an extra-cute appearance.
4. Spooky Ghost
Use grey or black yarn for the eyes and create a surprised mouth instead of a smile.
5. Ghost Garland
Make several mini ghosts in different colors and attach them to a decorative string.
6. Glow-in-the-Dark Ghost
Use glow-in-the-dark yarn for the sheet to create a fun Halloween decoration.
Related : Granny Stitch Christmas Tree Ornament , Easy Crochet Pattern
Helpful Tips for a Perfect Mini Crochet Ghost
- Keep your stitches tight: Small amigurumi projects need firm stitches to prevent stuffing from showing.
- Use a stitch marker: It helps you keep track of continuous rounds.
- Stuff gradually: Too much stuffing can make the head look uneven.
- Shape the arms carefully: Make sure both arms point outward.
- Take your time with the face: Small facial details can make a big difference.
- Keep the skirt loose: Avoid pulling the sheet too tightly around the body.
Common Problems and How to Fix Them
Why does my ghost look uneven?
Uneven stitch tension or inconsistent stuffing can affect the final shape. Try to maintain the same tension throughout the project and distribute the filling evenly.
Why are the arms curling?
Your slip stitches may be too tight. Try making them slightly looser and gently straighten the arms after finishing.
Why doesn’t my ghost’s sheet look wavy?
Make sure you’re following the different stitch heights in the final round. The combination of single crochet, half double crochet, double crochet, and slip stitches creates the decorative edge.
Why can I see the stuffing?
Your hook may be too large for your yarn, or your stitches may be too loose. Try using a smaller hook and maintaining consistent tension.
Frequently Asked Questions
Is this mini crochet ghost suitable for beginners?
Yes! This project uses basic crochet techniques, making it a fun project for beginners who already know how to make a magic ring and work single crochet stitches.
How much yarn do I need?
You only need a small amount of white yarn, plus a few scraps of black and pink yarn for the facial details.
Can I use a different crochet hook?
Yes. You can adjust the hook size depending on your yarn. Just make sure your stitches are tight enough to hide the stuffing.
Can I make this ghost bigger?
Absolutely! Use thicker yarn and a larger crochet hook to create a bigger version. You may also need additional stuffing.
Can I sell finished crochet ghosts?
You can sell finished handmade items if you are using a pattern that permits commercial use. Always check the designer’s licensing terms before selling items made from someone else’s pattern.
Is this crochet ghost only for Halloween?
Not at all! You can make pastel versions for everyday decorations, gifts, keychains, or cute handmade accessories.
Final Thoughts
This Mini Crochet Ghost Amigurumi is a lovely little project for anyone who enjoys making cute seasonal decorations.
With its tiny arms, sweet embroidered face, and wavy sheet, it’s a fun way to bring a little handmade charm to Halloween.
Make one for yourself, create a whole collection in different colors, or give one as a thoughtful handmade gift.
Grab your favorite yarn, pick up your crochet hook, and enjoy making your own adorable little ghost!
Happy Crocheting!