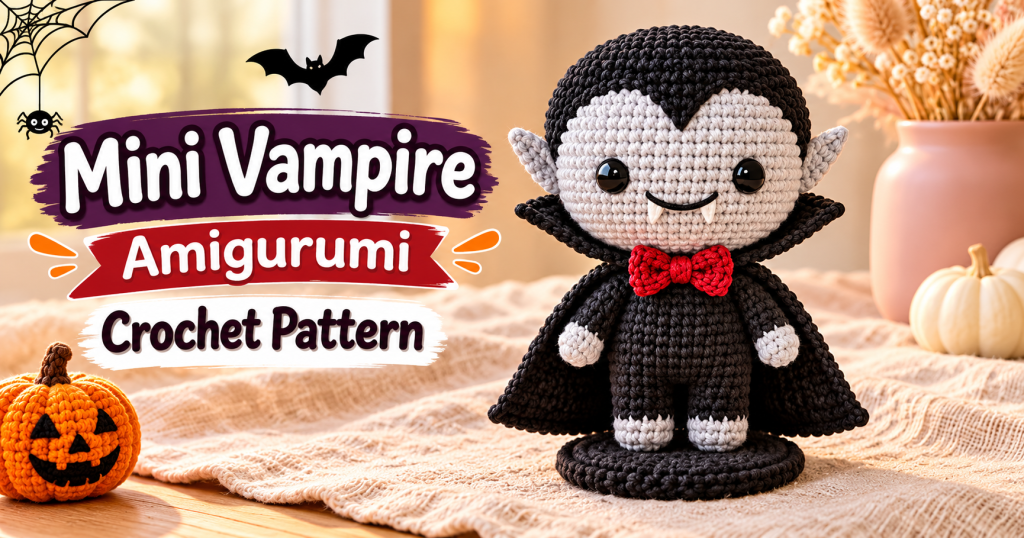
This mini vampire amigurumi is a 3½-inch Dracula for Halloween, with a widow’s peak, pointy ears, tiny fangs, a collared cape and a red bow tie. It’s crocheted in DK cotton with a 2.5 mm hook, in about 3 to 4 hours. The head and body are worked in the round, the cape is a little flat piece in rows, and the face is embroidered. He stands on a round base, so he’s perfect for a Halloween shelf.
Highlights
The “peak” shape (V-shaped at the forehead) is created using crochet, with a simple division of color over 5 turns; No need to sew or use felt.
The legs are integrated with the body during work, so that there is only one connection point left: between the head and the body.
The cloak comes in the shape of a flat semicircle, with a standing collar formed directly into its starting chain.
The amounts of yarn needed are small: about 60 yards of black (35 yards if you exclude the base), 15 yards of gray, plus leftover red and white yarn.
Related : Mini Crochet Ghost Amigurumi Pattern , Easy Halloween Ghost
Why do I love this little vampire?
Halloween decorations can often be spooky, but this piece is absolutely adorable. He is perhaps the friendliest “Dracula” you’ll ever meet, with his wide eyes, gentle smile, and tiny fangs. Small enough to fit in the palm of your hand, he’s perfect for decorating your desk, adding a touch of charm to a Halloween table display, or even tucking into a Halloween gift basket for adults.
This design is also a fantastic choice for your first “amigurumi” (crocheted doll) project. Each part is small and quick to make, and you’ll learn three useful techniques: changing colors mid-round, joining two legs to form a single body, and crocheting a collar starting from a foundation chain.
Skill level: Intermediate. The project requires proficiency in techniques such as the magic ring, single crochet (sc), increasing and decreasing in continuous rounds, color changes, and some simple embroidery. The cape involves half-double crochet (hdc), double crochet (dc), and treble crochet (tr) stitches.
If you enjoy small Halloween-themed creations, you might also like my “Pumpkin Cat” design—a sleepy-looking black cat peeking out from inside a pumpkin.
What you’ll need
Yarn (DK weight #3 cotton)
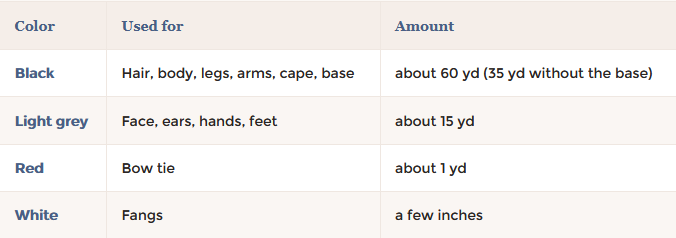
I prefer using “Paintbox Yarns Cotton DK” (137 yards / 125 meters per 50g ball); one ball of each color is sufficient to make several vampire dolls.
These quantities were calculated based on the number of stitches in each piece, with an additional margin of approximately 20% to account for color changes and yarn ends.
Tools and Supplies
A 2.5 mm crochet hook (US size B/1 or C/2). A 2.25 mm hook is recommended if the stuffing shows through the stitches.
6 mm black plastic safety eyes (alternatively, you can embroider the eyes using black yarn; please refer to the safety note).
Polyester fiberfill, a stitch marker, a yarn needle (tapestry needle), and scissors.
Optional: A circular piece of plastic canvas or stiff cardboard, approximately 1¾ inches in diameter, to serve as a base for the doll.
Gauge
Gauge is not critical. What matters is the tension of your stitches: they should be tight enough so that the stuffing does not show through. Using medium-weight cotton yarn and a 2.5 mm crochet hook, the head will be approximately 4 cm wide at its widest point. A looser tension will result in a slightly larger vampire, which is perfectly fine.
Abbreviations (US Crochet Terminology)
Magic Ring: MR
Chain: ch
Slip stitch: sl st
Single crochet: sc
Half double crochet: hdc
Double crochet: dc
Treble crochet: tr
Increase: inc
Two single crochets in the same stitch
Invisible decrease: dec (crochet two single crochets together through the front loops)
Stitch(es): st(s)
Round: R
Work the head, body, legs, and arms in continuous rounds: do not join the rounds, and move your stitch marker to the first stitch of each round.
Working Instructions (Pattern)
Part One: The Head (in Black and Gray)
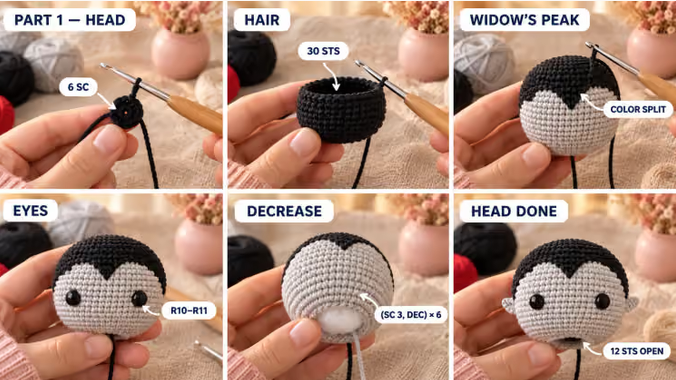
Begin at the top of the head using a “magic ring,” and continue crocheting downwards until you reach the neck opening.
Hair (in Black)
Round 1: 6 single crochet (sc) stitches into a magic ring. (6)
Round 2: Increase (inc) in each stitch × 6 times. (12)
Round 3: (1 sc, inc) × 6 times. (18)
Round 4: (2 sc, inc) × 6 times. (24)
Round 5: (3 sc, inc) × 6 times. (30)
Rounds 6–7: 1 sc in each stitch. (30)
The Face and “Bangs” (which form a V-shape): Since the head is circular up to this point, any spot can be considered the “back.” Rotate the piece so that the stitch marker (marking the start of the round) is positioned in the middle of the back. From this point forward, each round will begin at the back.
To change colors, pull the new yarn color through during the final step of the previous stitch. Leave the unused yarn running loosely inside the head, behind the stitches.
Round 8: 8 sc in black, 5 in gray, 4 in black, 5 in gray, 8 in black. (30) The four black stitches in the center represent the peak of the “bangs.” Round 9: 7 single crochet stitches in black, 7 in gray, 2 in black, 7 in gray, 7 in black. (30) Here, the “bangs” (fringe) narrow down to form a point.
Round 10: 6 single crochet stitches in black, 18 in gray, 6 in black. (30)
Round 11: 5 single crochet stitches in black, 20 in gray, 5 in black. (30)
Round 12: 5 single crochet stitches in black, 20 in gray, 5 in black. (30) Cut the black yarn, leaving a short tail inside the head.
The black section at the back represents the hair, which extends down to the back of the head (the neck). From this point on, the face will be worked in gray.
Related : Christmas Granny Square Crochet Pattern, Festive Holiday Design (PDF Download)
The eyes: Insert the safety eyes between rounds R10 and R11, at stitches 12 and 19 of round R10 (counting from the beginning of the round). This leaves 6 stitches between the eyes, with 5 gray stitches on the outer side of each eye. This spacing gives the doll a cute look and a rounded face. Ensure they are positioned directly below the top of the head before securing the backings of the safety eyes.
The lower part of the head (in gray). Row R13: (3 single crochet, decrease) × 6. (24 stitches)
Row R14: (2 single crochet, decrease) × 6. (18 stitches)
Stuff the head well and firmly.
Row R15: (1 single crochet, decrease) × 6. (12 stitches). Make a slip stitch into the next stitch, then cut the yarn, leaving a short tail. Add more stuffing if necessary; the neck area will remain open.
Part Two: Legs, Body, and Arms (in Gray and Black)
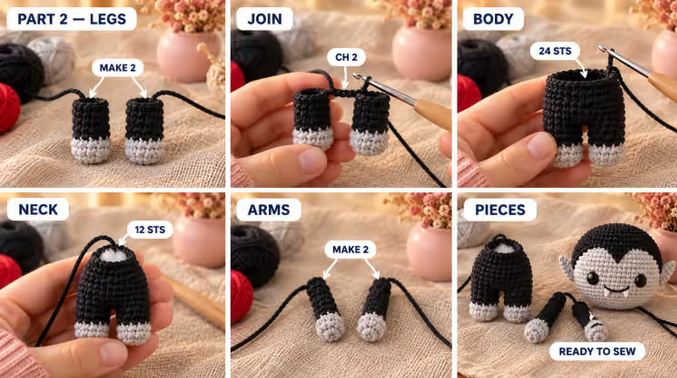
Legs (make 2). Each leg begins at the foot.
Round 1 (Gray): 6 single crochet (sc) in a magic ring. (6)
Round 2: (1 sc, 1 increase) × 3. (9)
Rounds 3–4: 1 sc in each stitch around. (9) These sections represent the shoes in gray.
Round 5 (Black): 1 sc in each stitch around. (9)
Fasten off the first leg. Do not fasten off the second leg; you will use it to join the two legs together.
Body (Black). Lightly stuff the legs.
Round 1 (Joining): Chain 2. Then, work 1 sc into any stitch on the first leg, followed by 1 sc in each of the next 8 stitches (9 sc total), 1 sc into each of the 2 chains, 1 sc into each of the 9 stitches of the second leg, and finally 1 sc into the other side of the 2 chains. (22) Ensure the feet are facing forward before you begin joining.
Round 2: (10 sc, 1 increase) × 2. (24)
Rounds 3–5: 1 sc in each stitch around. (24)
Round 6: (2 sc, 1 decrease) × 6. (18)
Round 7: 1 sc in each stitch around. (18) Stuff the legs and body firmly. Round 8: (Single crochet, decrease) × 6. (12) Make a slip stitch into the next stitch. Fasten off, leaving a long tail (about 40 cm / 16 inches) for sewing the head. Add more stuffing if necessary.
Arms (make 2). Each arm begins at the hand.
Round 1 (gray): 5 single crochet in a magic ring. (5)
Rounds 2–3: Single crochet around. (5) These sections represent the hands.
Rounds 4–7 (black): Single crochet around. (5) Fasten off, leaving a long tail (about 20 cm / 8 inches). Do not stuff the arms.
Part 3: The Cape (Cloak), Collar, Ears, and Bow Tie
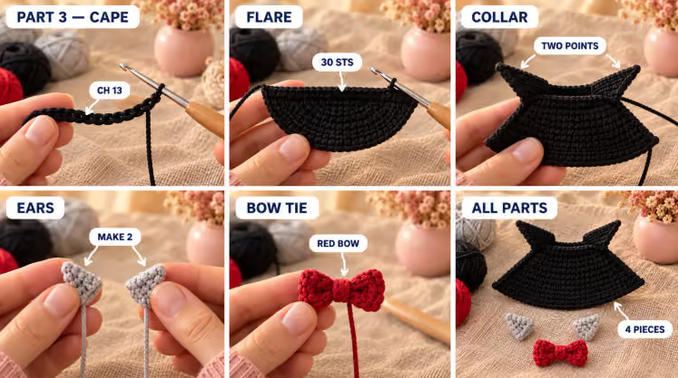
The Cape (in black). The cape is worked in rows, starting from the neckline and moving downwards. Begin by making 13 chain stitches (ch).
Row 1: Work a single crochet (sc) into the second chain from the hook, then work a single crochet into each subsequent chain. Turn your work. (12 stitches)
Row 2: Chain 2 (these do not count as a stitch; this applies to all rows). Work a half double crochet (hdc) into the next stitch, then work 2 half double crochets into the following stitch. Repeat this a total of 6 times. Turn your work. (18 stitches)
Row 3: Chain 2. Work a half double crochet into each of the next 2 stitches, then work 2 half double crochets into the following stitch. Repeat this a total of 6 times. Turn your work. (24 stitches)
Row 4: Chain 2. Work a half double crochet into each of the next 3 stitches, then work 2 half double crochets into the following stitch. Repeat this a total of 6 times. Turn your work. (30 stitches)
Rows 5–10: Chain 2, and work a half double crochet into each stitch across the row. Turn your work. (30 stitches). Do not cut the yarn. Edging: Chain 1, then work single crochet stitches evenly along the side of the cape (placing 2 single crochet stitches along the side of each half-double crochet row), stopping at the first row. Fasten off. Attach the yarn at the top edge of the opposite side and work in the same manner down to the bottom edge. Fasten off. This edging helps prevent the front edges of the cape from curling.
The cape measures approximately 2 inches (5 cm) in length; when laid flat, it forms a semicircle with a bottom edge circumference of approximately 5½ inches (14 cm).
Collar (in black): The collar is worked into the free loops of the starting chain, along the top of the cape. Attach the yarn at the right-hand end, with the right side (RS) of the piece facing you.
Before beginning, count the 12 free loops from right to left to determine where to work each section:
Start by making 3 chains (ch). These chains are not worked into any loop; they simply serve to bring the yarn up to the level of the first stitch.
Loop 1: Work one treble crochet (tr) and one double crochet (dc) into the same loop.
Loops 2–3: Work one double crochet (dc) into each loop. Loops 4–5: Work one half-double crochet (hdc) into each loop.
Loops 6–7: Work one single crochet (sc) into each loop.
Loops 8–9: Work one half-double crochet (hdc) into each loop. Stitches 10–11: Work one double crochet (dc) into each stitch.
Stitch 12: Work one double crochet (dc) and one treble crochet (tr) into the same stitch.
Chain 3 (ch 3), then work a slip stitch (sl st) back into stitch 12. Note that these three chains are not intended to create a new section; rather, they serve as a path to return downward from that elevated point. Fasten off, leaving a tail about 10 inches (approx. 25 cm) long.
You will now have 12 stitches in total: two stitches in the first stitch, one stitch in each of stitches 2 through 11, and two stitches in stitch 12. The treble crochet (tr) and the chain-3 (ch 3) at each end create two raised points, while the middle section remains lower—much like a classic “Dracula” collar.
Ears (make 2 in gray): Into a magic ring (MR), work the following: one single crochet (sc), one half-double crochet (hdc), one double crochet (dc), chain 2 (ch 2), then work a slip stitch (sl st) into the second chain from the hook (to form a small, pointed tip), followed by one double crochet (dc), one half-double crochet (hdc), and one single crochet (sc). Pull the magic ring tight to close it, but do not join the round with a slip stitch. Fasten off, leaving a tail about 8 inches (approx. 20 cm) long. Each ear resembles a small fan shape with a pointed tip.
Bow tie (in red): Into a magic ring (MR), repeat the following twice: (chain 2, 2 double crochets, chain 2, slip stitch into the ring). Pull the magic ring tight to close it; you will end up with a shape resembling two small wings. Wrap the remaining yarn 3 times around the center, and leave a tail of yarn to be used for attachment (sewing).
Part Four: The Face, Assembly, and Base
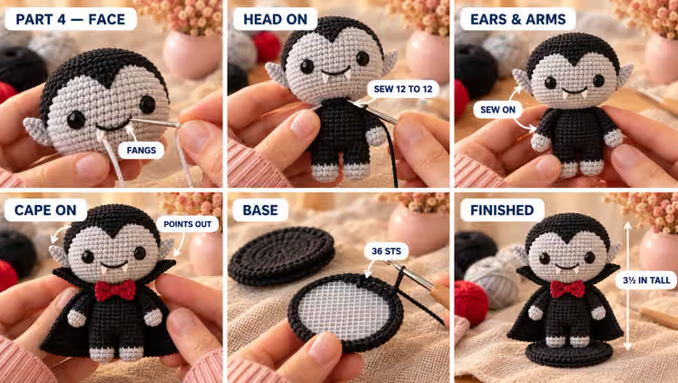
The Face: Use an embroidery needle and short lengths of yarn, starting and ending each piece at the neck opening, where the ends will be hidden.
The Mouth: Using black yarn, make a single straight stitch spanning 4 stitches across Round 12 (R12), positioned centrally below the eyes. Pull the yarn slightly to create a gentle smile, securing it with a small stitch in the center.
Fangs: Using white yarn, make two short, downward-pointing straight stitches extending from the mouth (one under each end), each about half the length of the mouth stitch.
Attaching the Head to the Body: Align the 12 open stitches of the body with the 12 open stitches of the head. Sew them together around the perimeter using the long yarn tail left from the body, passing the needle through both pieces at each stitch; repeat this process twice around the circumference. Add a little extra stuffing before closing the opening completely to ensure the neck is firm and does not wobble.
The Ears: Attach an ear to each side of the head, along the edge of the face, between Rounds 10 and 12 (R10–R12), with the tips pointing upward and outward.
The Arms: Flatten the top of each arm, then sew it onto the side of the body at Rounds 6 and 7 (R6–R7), positioning the hands to face forward. The Cape (Cloak): Wrap the cape around the neck so that the collar stands up behind the head, with the two front ends meeting under the chin. Sew the top edge (the first row) to the body all the way around the neckline. Then, attach the bow tie over the point where the two front ends meet.
Positioning the Arms: Arrange the cape so that it drapes behind the arms, leaving the hands visible in front, while the cape extends outward from behind them.
Securing the Collar Upward and Outward: Using the remaining yarn from the collar, secure the center of its lower edge to the back of the head with two or three small stitches, positioned about two rows above the neckline. Next, bend the ends of the collar outward (away from the head) and apply a light puff of steam to help them hold their shape. For a firmer collar, brush the ends with a little fabric stiffener (or a 1:1 mixture of white glue and water) and let them dry while held in the outward-facing position. This step is optional and is best avoided if the doll is intended for a child to play with.
The Base (optional, in black). Make two circles:
Round 1: 6 single crochet stitches into a magic ring. (6)
Rounds 2–6: Increase by 6 stitches in each round, just as you did for the head: (inc × 6), (sc, inc) × 6, (2 sc, inc) × 6, (3 sc, inc) × 6, (4 sc, inc) × 6. (36) Finish off with a slip stitch and cut the yarn (for the first circle).
Place a circle of plastic canvas between the two crochet circles, with their inner sides facing each other. Using the remaining open loops of the second circle, work single crochet stitches through the edges of both circles, all the way around the circumference. (36) Finish off and cut the yarn. Attach the feet to the center of the base using black yarn, passing the needle through the sole of each foot several times. The base has a diameter of approximately 2 inches (about 5 cm), allowing the vampire figure to stand on its own.
Safety: This little vampire features safety eyes (securely attached) and may contain a piece of plastic canvas inside; therefore, it is intended as a decorative item, not a toy for children under three years of age. If you wish to make it suitable as a toy, you can embroider the eyes using black thread (by layering a few straight stitches), omit the plastic canvas, and ensure that every part is sewn on and secured very firmly.
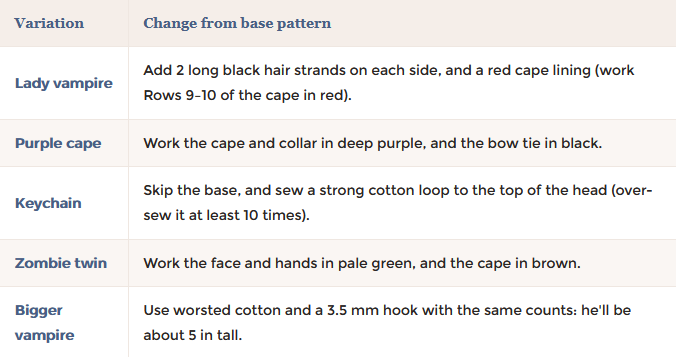
Add your own personal touch — quick modifications
Addressing Three Common Issues
The “Hair Crown” (the central meeting point of the hair) is off-center
Since amigurumi dolls are crocheted in a spiral, this point may shift by one or two stitches; this is perfectly normal. Position the eyes below this point, leaving a gap of 6 stitches between them. Rely on your visual judgment rather than just counting stitches—this will ensure the face looks balanced and correct.
Black yarn showing through the gray face
The black yarn (carried along the back of the work) might be pulled too tight, or it may have snagged and appeared on the front side. Ensure that the yarn is carried loosely (without tension) behind the stitches. For rows 10 through 12—where the black yarn is only present on the back—you can cut the black yarn and reattach it later if you notice it showing through on the face.
Inability to stand
Make sure to stuff the legs firmly, and ensure the feet sit perfectly flat on the base before sewing them in place. If you are not using a base, the best way for the doll to stand is by having it lean against its own cloak.